
The bosses in Metroid Prime 4 are some of the best in the series. However, many are far from straightforward in their patterns, and the answers to taking them down aren’t always so obvious. If you’re feeling a bit stuck on some of them, this guide should help you take them down in no time. (Be prepared for potential spoilers)
Aberax
The first boss in the game is pretty straightforward, as he’s before Samus gets any of her telekinetic abilities. He fires lasers at you that are pretty easy to dodge with Samus’ dash, and does a ground slam that makes an electric shockwave to jump over.
In order to damage him, you have to destroy 4 spots on his chest that have shields that periodically go down. As you get his health down low enough, he’ll begin to shoot large pillars that either have to be jumped over or dodged with the morph ball, and he will physically begin to block his weak points himself. This is pretty easy to get around by aiming with the switch’s gyroscope; however, as long as you keep whittling away at his weak points, he’ll go down in no time.
Carvex
The giant plant monster is the first boss to force Samus to utilize her telekinetic abilities. In order to get it to lower its shell, you have to destroy the bulges near the top it’s tentacles. Watch out for the homing attacks Carvex will launch at you, as well as different attacks with its tentacles, which include slamming them down at you as well as sliding them across the ground.
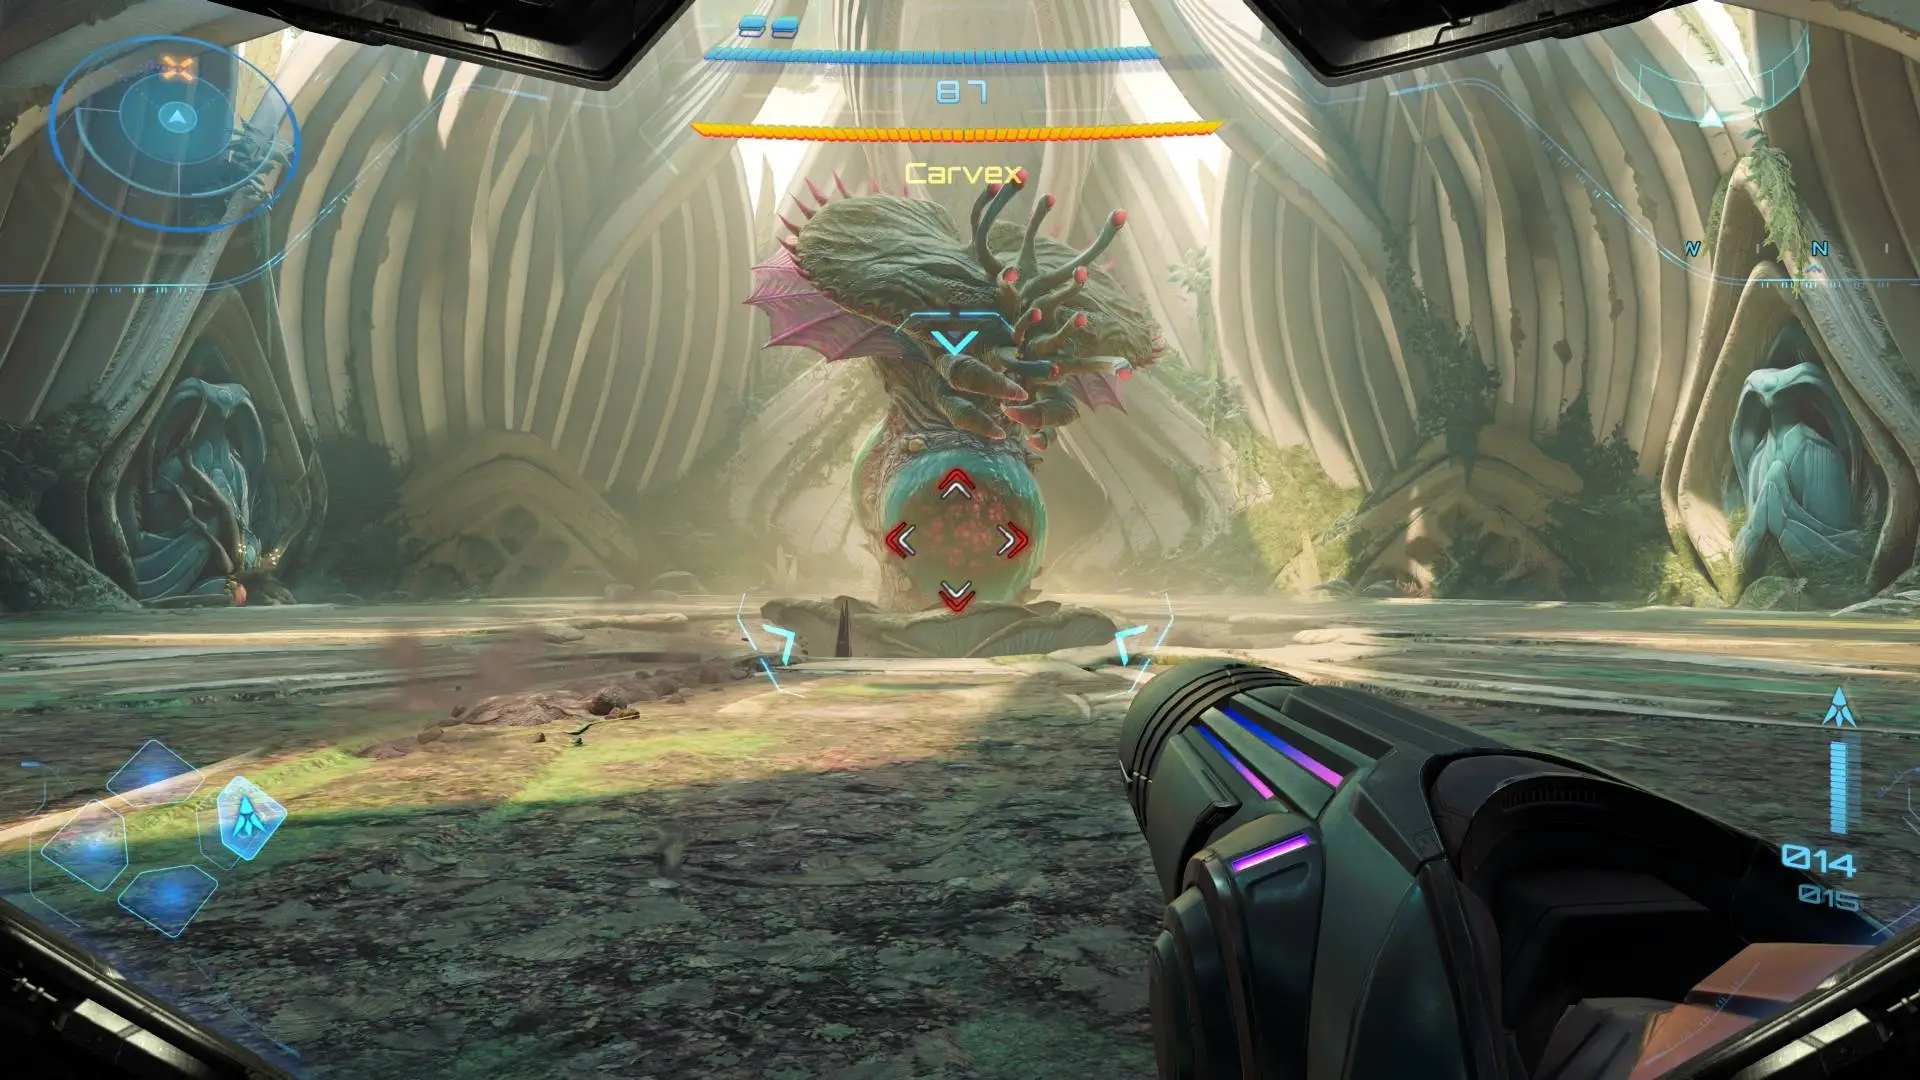
When you do lower its shell, Carvex will also launch ground spikes at you, so keep dodging as you attack it.
After destroying one tentacle, Carvex will spawn more, and you can’t destroy them fast enough with Samus’s usual attacks. Switch to visor mode and charge up a control shot, and use it to guide it through each of Carvex’s tentacles to lower its guard once again. Make sure you weaken the tentacles first, as each has an outer crust, which’ll make the control shot disperse if you don’t.
Carvex will spawn 3 tentacles eventually, then a root of walls to make guiding the telekinetic charge more difficult as you get it’s health low, but the overall process of lowering its shell doesn’t change. After the wall of roots goes up, Carvex should go down the next time you lower its shell.
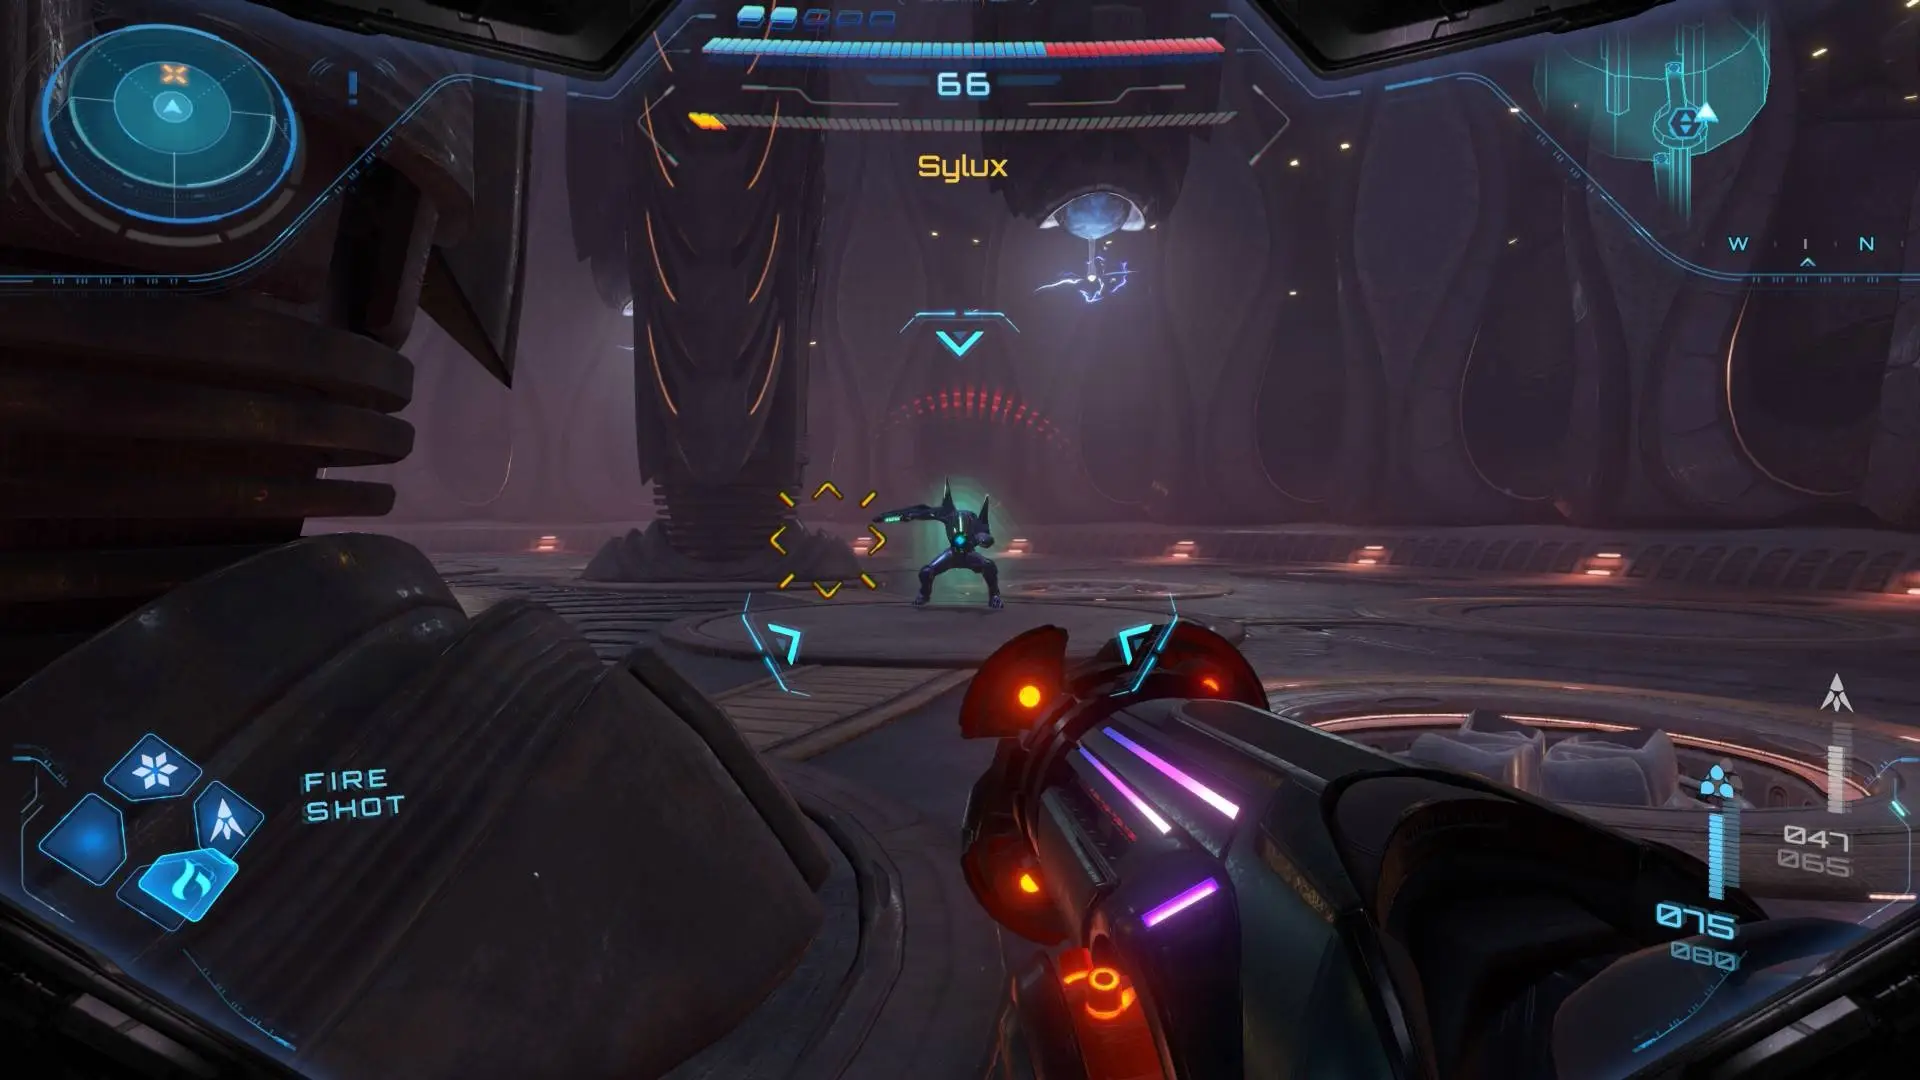
Sylux 1
The bitter enemy of Samus is one that gets encountered multiple times throughout the game. His fight starts off pretty straightforward. He shoots homing missiles at you that can be destroyed, has a lunge attack that deals a good amount of damage if you don’t dodge it, and sends electric waves across the ground.

Once you get his health down a bit, Sylux will encase himself in an energy shield that deflects your attacks and turns himself into a tornado. You’ll have to use the morph balls and psychic bombs to get the shield down. This gets a bit tricky as you have to dodge Sylux as you switch between morph ball mode as well as visor mode to use the telekinetic bomb.
After hitting him with 3 bombs, his shield will go down, and Sylux will be vulnerable for a brief period to rain down whatever attacks you can on him. He’ll resume his other attacks, as well as a new one where he flies and shoots electric arcs down. Eventually, he will go back into his shield, and his spins do become faster and more aggressive each time you take it down. The process to get his shield down doesn’t change, however. Repeat the process a few times, and Sylux will be defeated, for now at least
Xelios
Xelios is more straightforward than Carvex or Sylux, but it keeps you on your toes.
Don’t worry about using missiles in this fight. Just keep firing at any spots on its shell that turn green to expose its core, well placed charged shots should expose big chunks of it if you aim correctly. Xelios pretty much never stops launching attacks; it shoots slow green orbs out as well as faster pink ones in large quantities. Both of these can be destroyed and used to regain health.
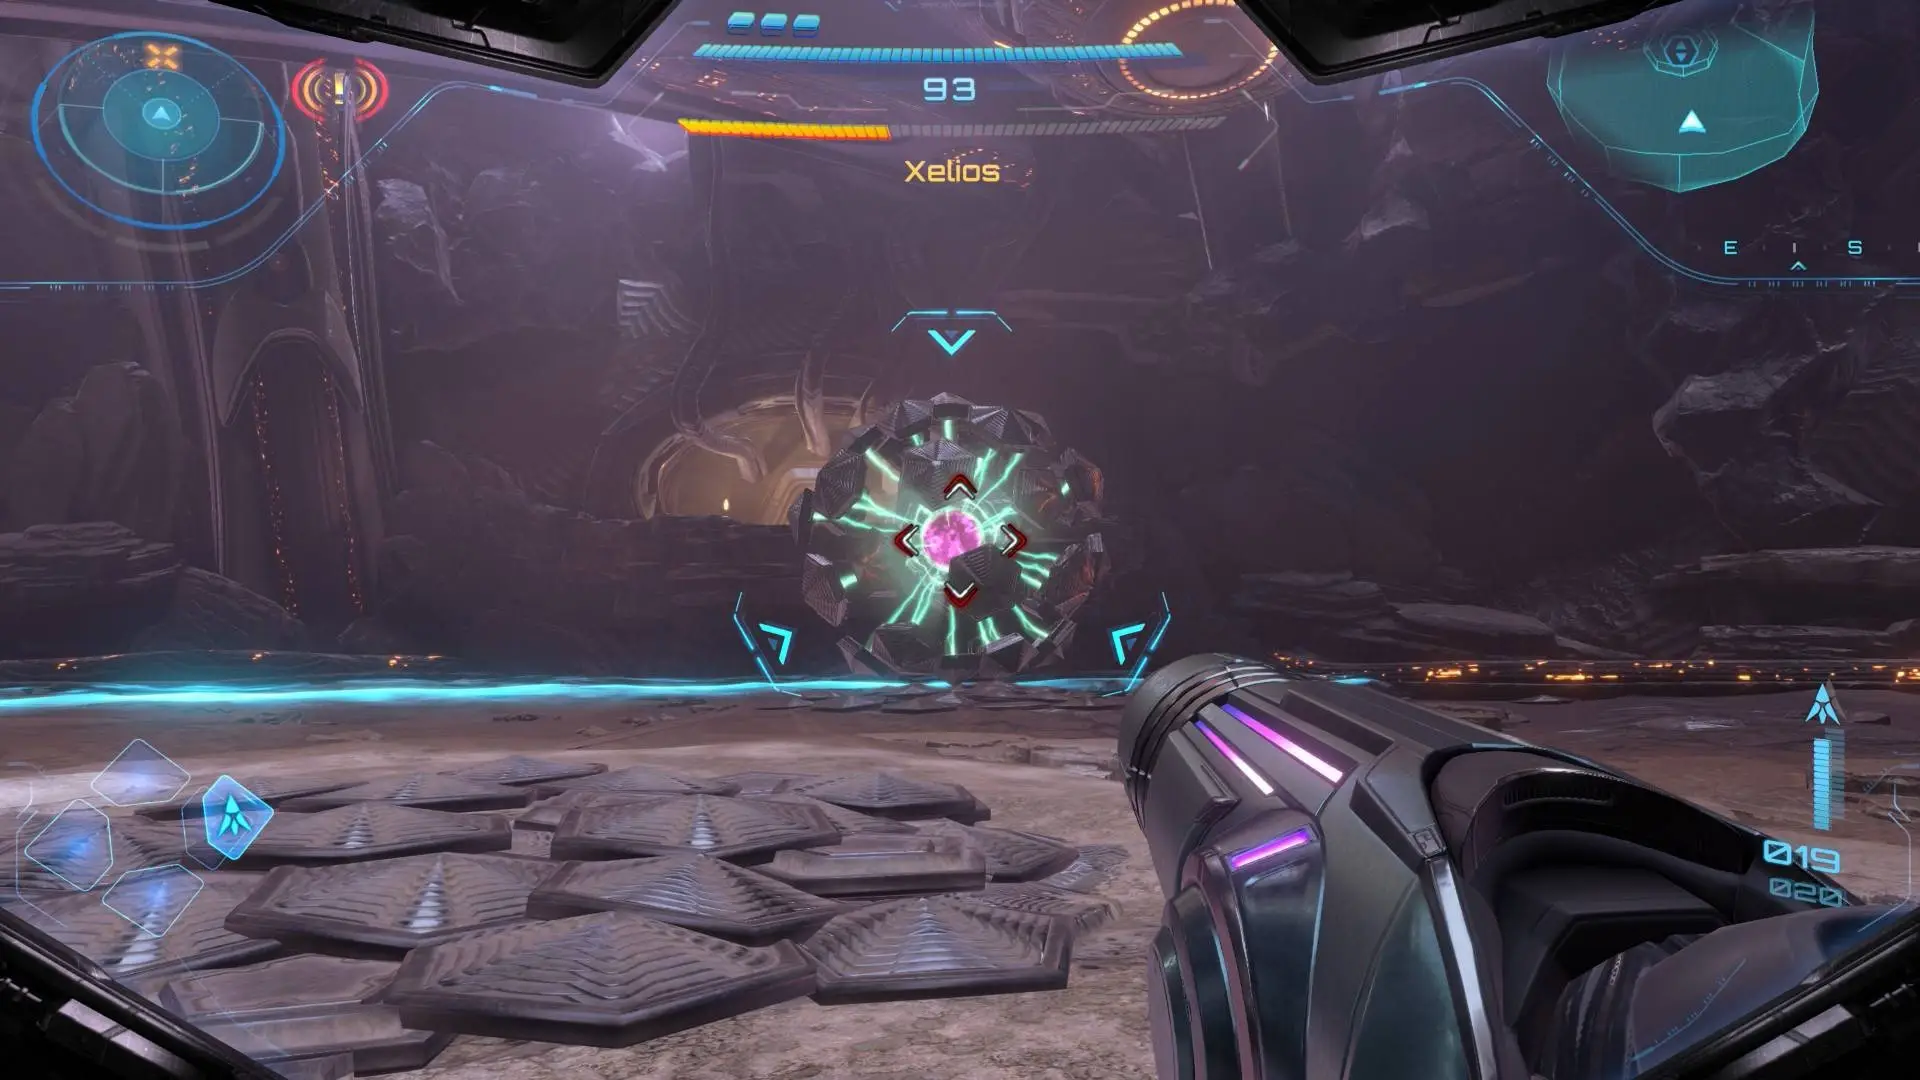
It’ll also shoot out massive green electric balls that come fast and will take about 35% of your health if they hit. It’s not too difficult to time a dodge to avoid it, thankfully. After you get its health to certain points, Xelios will retreat underground to recover its shell, launching a wave to jump over in the process.
After the first time it does this, it’ll fly close to you and launch an energy blast within a zone that you have to be quick to get out of. Later on in the fight, it can actually stun you before it tries this attack, and you quickly have to switch to the morph ball and use a bomb to free yourself and get out of dodge before it explodes.
Xelios will also do diagonal lightning strikes. Just dodge in the direction it’s starting its attack from, and you should be able to clear it. As long as you keep moving and keep chipping away at its shield and core, Xelios will go down.
Keratos
Keratos will take a bit more to put down than other bosses, as you have to do a significant amount of damage to its eye before you can actually hurt it. Whenever it opens its eye, shoot at the yellow spot as much as you can before it closes up. He’ll open it and close it in between his various attacks. Keratos has probably the widest attack variety of any boss so fa,r and perhaps the hardest to dodge as well.
It can surround itself in a small Ice wall and start creating a tornado to pull you into it. You can break the ice wall using any attack, but missiles or the heat shot will get the job done the quickest.

It can also slam into the ground and raise up different kinds of spikes, one that you can jump over and another that you have to try and weave in between as the gaps widen in between them, which can be made a bit easier with the morph ball. Beware that getting hit by the jumpable ones will freeze you in place, leaving you open for another attack if you don’t mash out quick enough.
It can also start ricocheting off the walls, and you’ll have to dash in the right direction to avoid it.
Keratos fires multiple different projectiles, two different kinds of ice darts, one that it rapidly fires as it spins on the ground, and another that it launches while its eye is exposed, which are larger but also shoot spiraling darts around it. Neither is too difficult to dodge.
It’ll also fire ice discs, which can be destroyed to replenish health and ammo, and 3 stationary projectiles, which can also be destroyed. It’ll typically launch its stationary projectiles before its ricochet attack. It can also fire a beam of ice that’ll freeze you if it hits you.
When you damage its eye enough, Keratos stumbles a bit then prepare its most damaging attack where it spins in place like sonic the hedgehog and comes at you at full speed. Dodge this, and it’ll slam into the wall where you can hammer away at its weak spot, with the fire shot giving you the best results. Keratos should go down after the 3rd or 4th time you reveal its weak spot.
Pheneros
Pheneros has a 2-part boss fight. The first phase sees you fighting it on your bike and is pretty straightforward as you simply aim at the cores on its stomach as it surfaces from the lava. After you destroy all of those, a fight on foot begins. Aim at the 4 cores on its face, then shoot at its mouth whenever you destroy a core. After destroying all 4, it’ll become stunned for a considerable time, and you’ll be able to do a lot of damage.
Destroying the cores can be a bit tricky, as you have to lock on and then free aim as Samus will always aim at the center of its face rather than the cores themselves and Pheneros doesn’t remain stationary. As the battle goes on, the number of cores becomes fewer at certain times and Pheneros eventually moves the cores from its face to a cobra like hood on its head which can be even more of a challenge to aim at.

Pheneros doesn’t have too many attacks, but the ones it does have do a lot of damage and can deplete a full energy tank in about 2 hits if you’re not careful. Early on, it’ll sweep across the area while firing a huge laser from its mouth. Use the morph ball to dodge this. Keep in mind that as the fight goes on, this attack becomes faster, and it’ll do it multiple times.
Any time you destroy a core, it’ll lunge at you and try to eat Samus. If you don’t manage to dodge, you’ll have to mash the A button to get out.
Later on, Pheneros will also fire its laser at you directly, which you can tell it’s about to do when its mouth begins smoking. This attack deals massive damage, so make sure to time your dodge well.
Pheneros will also shoot 5 large homing balls of fire at you, which can be destroyed to restore health and ammo. Much like its other attacks, it’ll get faster the more you drop its health.
Eventually, after you get its health down enough, Pheneros will become catatonic with its mouth wide open. Fire a control shot to destroy the core inside to finish it off for good.
Sylux 2
Sylux fights a bit differently the second time around. Although he’s more aggressive, he goes down a bit faster (but not easier) since he no longer does his tornado shield. He still lunges at you, does the homing missiles, and sends electric waves along the ground but this time he’ll also send a large electric wall that you have to back away from. Sylux will be stunned a bit after performing this attack, and also drops HP after
The biggest change about this fight is that throughout the fight, Sylux will electrify the whole floor this time, and you have to use the various grapple points to get away or it’ll drain your HP fast. If you use the grapple points on the wall instead of the pillars hanging from the ceiling, you’ll be able to fire off a few shots on Sylux, but make sure you grapple to another point before he gets too close.
Otherwise, this fight is fairly straightforward. Just keep shooting at Sylux and dodge his attacks accordingly until he goes down.
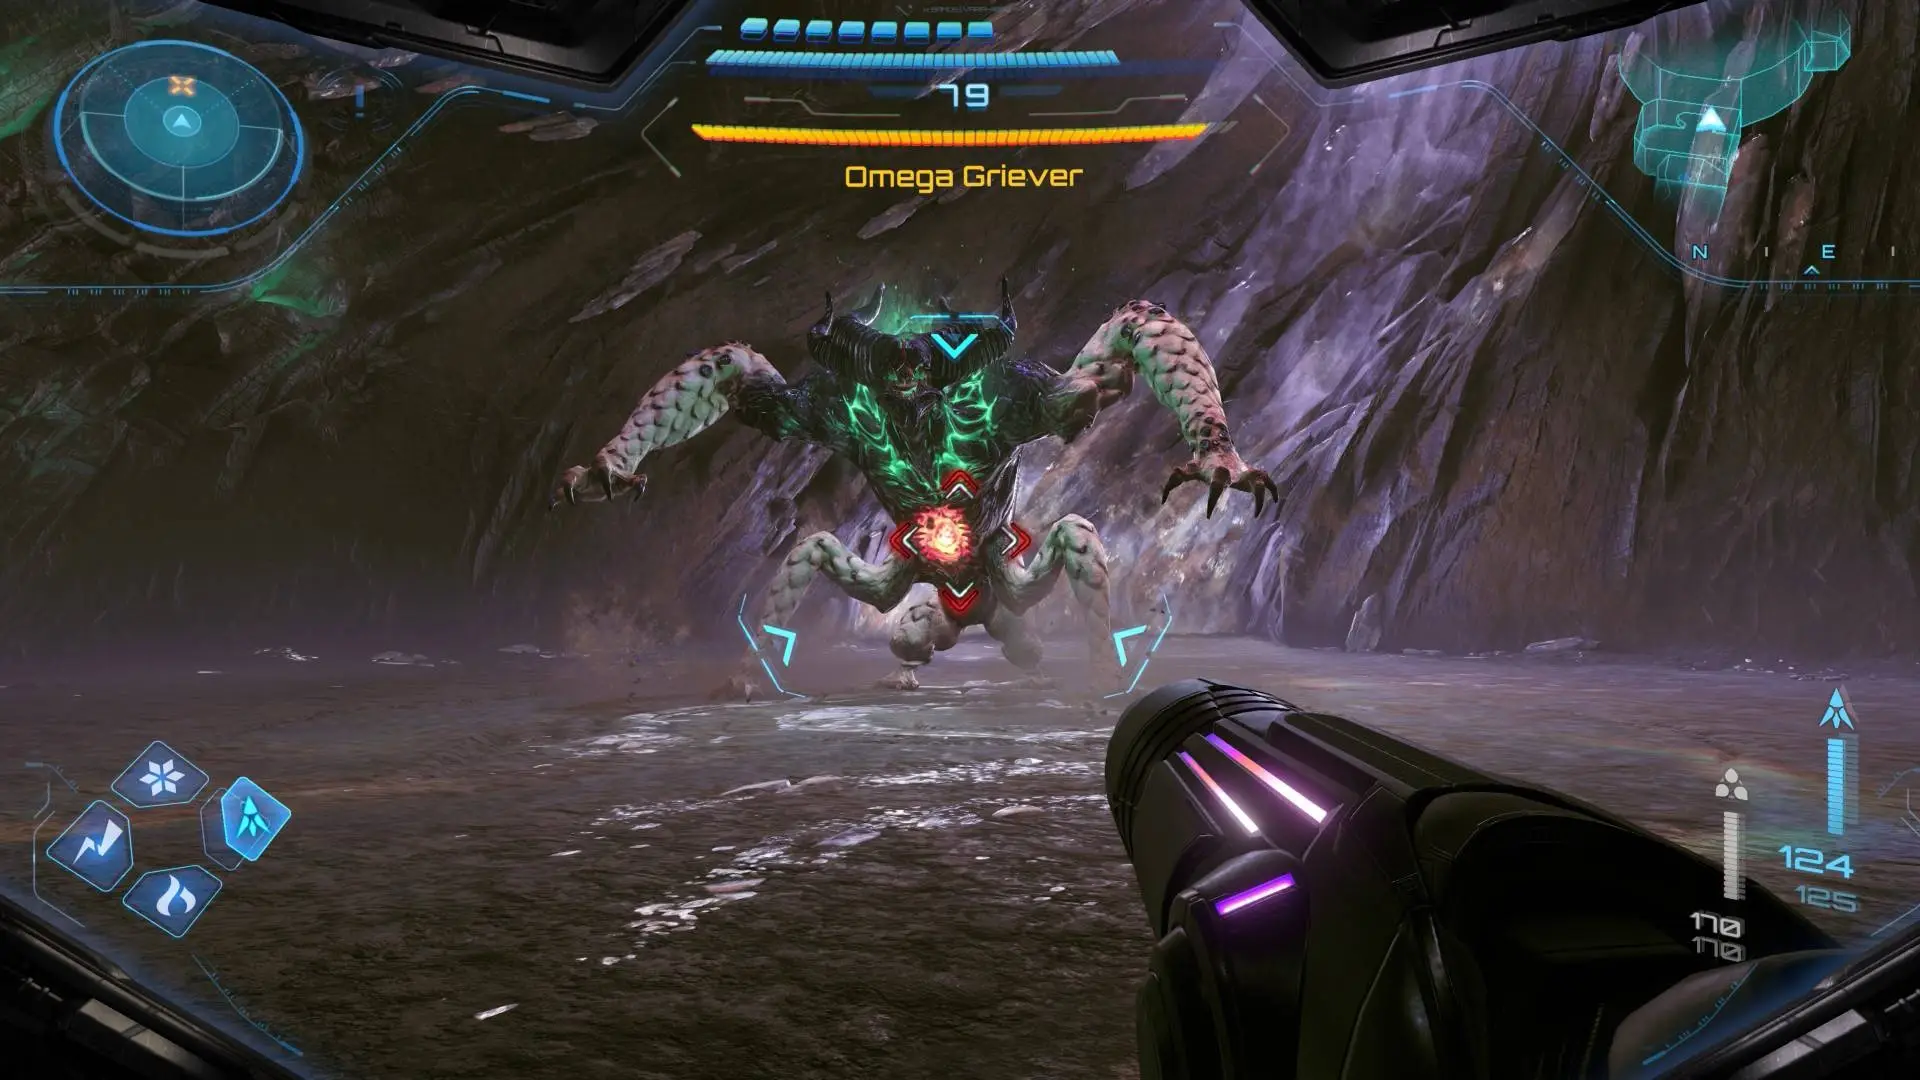
Omega Griever
By this point in the game, you’ll have learned how annoying grievers can be as enemies, and the Omega Griever is the king of them.
He starts the fight scaling the walls and is not an easy target to hit, as you have to hit its limbs since any shots to its body will bounce off. (It’s worth noting that the thunder shot, especially if you’ve managed to find the upgrades for it, will make the Omega Griever far less of a problematic battle. Otherwise, super missiles will also be effective. In order to hit him effectively, lock on, then either aim with the gyroscope or the right stick.
The Omega Griever will constantly move around while on the walls and will shoot green balls of goop that slow you down, so you have to make your shots count. After you hit its limbs enough, it’ll expose its chest, then unload on it until it gets knocked off the wall.
You’ll still have to hit its limbs to expose its chest again, and when it’s grounded, I actually found it easier to shoot its arms without locking on.
The griever has a large array of attacks. It can swipe at you, which it’ll do more of as you get its health down lower. It can lunge at you, make earthquakes, which you’ll have to jump over, and also shoot its green goop, which again will slow you down. It can also ensnare you in its tongue and will try to pull you in, but this can work to your advantage if you can score some easy shots as it tries to pull you in and bite you. Later in the fight, it’ll also perform a sweeping laser attack, which can be avoided with the morph ball at a certain space or by jumping over it.
After you hit its limbs enough, the Griever will collapse, and you’ll have to go morph ball and place some bombs under it to expose its chest. Unload with whatever you have while its chest is exposed.
The Griever will fall back and call for helpers at certain points throughout the fight. Deal with them and absorb any health or ammo that the Griever leaves as it smashed a hole in the wall to hide in. After you kill the helpers, you’ll have to go through the process of knocking it off the wall again. You’ll notice that the areas to shoot on its limbs will be getting smaller as well.
After you repeat the process enough, the Griever will fall over with its tongue out, revealing the power bomb upgrade. This is a fake-out, however, and the griever grabs Samus when you get close, and you’ll have to shoot it quickly to escape.
The Griever gets the most aggressive after this with its attacks, but just avoid the attacks accordingly and expose its weak spot once more to finish him off with either the super thunder shot or super missiles.
Varmis

Varmis is the easiest boss in the game and the only one that’s fought on your bike entirely. All you have to do to put it down is make sure you avoid getting rammed into and boost into its tail. It won’t put up much of a fight outside, trying to ram into you and splashing up and coming down. Just keep slamming into its tail, and it’ll go down in no time. Occasionally, you can shoot the tail just to recover your boost faster.
Sylux Final
The last battle with Sylux is one hell of a final showdown to say the least, and is a 3-part fight in total.
The first phase of the fight sees Sylux in a protective shield, attacking you with tentacles. The Galactic Federation troops help out in this fight as they’ll shoot the heads of the tentacles along with you. Be careful, as you do have to make sure they don’t die. Thankfully, they aren’t pushovers, and you can heal them if their health gets low.
His attacks during this phase primarily consist of slamming the tentacles down at you. After you damage one enough, you’ll have to use the lasso to destroy it. Super missiles or a fully charged thunder shot are effective for this, but your standard shot can get the job done, too. After you pull all the tentacles down, Sylux’s shield will drop, and you can fire away at him.

When his shield reforms, Sylux’s tentacles will change to a different elemental type of attack. He starts off with fire the first time and will shoot small lasers and fireballs at you, and he’ll also lunge one of the tentacles at you, similar to Pheneros, and try to chomp down on you. He’ll do this during his other phases as well.
Whether you destroy all the heads or wait it out, Sylux will go back to his original form. He’ll have one extra tentacle this time and will have a couple of new attacks, such as sweeping his tentacles across the ground and turning into a giant buzzsaw with them. The process to take down his shield remains the same.
Sylux will change elements two more times. One where he gains ice abilities and will use gusts to pull you in and hit you with his tentacles. This can be avoided by constantly back-dodging.
After this phase wears off and you manage to drop his shield again, Sylux will switch to thunder. This is the most dangerous one to avoid, as you have to pay attention to the ground to avoid getting zapped. This is also where the federation soldiers will end up losing the most HP, so make sure to pay attention if one needs healing. After you drop Sylux’s shield one more time, phase two of the fight begins.
Sylux will isolate Samus from the soldiers, and the two of them will fight through another dimension. Brush off your Star Fox skills as this fight turns into an on-rails shooter of sorts. Keep pelting Sylux with charge shots as he’ll drop large health pick-ups when you do. Most of Sylux’s attacks aren’t too hard to dodge in this phase, but a couple can be tricky. He’ll shoot large discs at you early on, but just move the opposite direction they pop up o,n and you should be ok. He’ll also fire small shots from his gun, as well as a larger laser. His hardest attack to dodge in this phase is when he’ll shoot two thin, constantly twirling pillars. I had the best luck getting past these by staying closer to the corner. Once you get his health down enough, phase 3 of the fight begins.
Phase 3 may resemble the earlier battles with Sylux at first, but he has more than a few new tricks up his sleeve. His attacks are more aggressive overall; his lunge attack is different now, as it requires you to jump over him rather than dodge. The electric waves he shot are now just large area pillars that get a bit bigger as they go on, so try to jump over them early
He’ll also go into his own morph ball form, where he can charge into you and steal one of your energy tanks. You can charge your boost ball at the right time to dodge this. You can get it back from him but if he grabs it before you, he’ll heal himself when he leaves his morph ball form. While in his morph ball, Sylux will lay down lines of electricity as well as shoot pulses out. Use missiles to try and stun him while he’s in this state.
Eventually, Sylux will leave his morph ball. If he managed to snag one of your tanks, it’s the perfect time to hit him with a power bomb while he tries to heal. It’ll not only stun him and do more damage than he heals, but it’ll give you HP and ammo as well.
During this phase, he’ll unleash his most devastating attacks. He’ll summon a small black hole, which absorbs almost anything you shoot at it. The control shot will work here, and you can hit him out of the attack, but you have to be careful to steer away from the black hole’s pull. When his health is very low, he’ll also follow this attack up with lightning strikes. He’ll also charge up a massive laser that’ll drain multiple energy tanks if you’re caught in it, so make sure you time your dodge well.
There are no other tricks other than to dodge his attacks properly and shoot. Keep it up, and eventually you’ll win the last battle with Sylux.
That’s all the main bosses for Metroid Prime 4. Hopefully, this guide helps you take down any you may have been struggling with!